This article illustrates the installation of Oracle Database 12c Release 1 (12.1) (64-bit) on Oracle Linux 6 (64-bit) using Oracle VM VirtualBox. The article is based on a server installation with a minimum of 4G swap, 2.5GB RAM with SELinux and firewall disabled. Please refer to my previous post http://insightintooracle.blogspot.com/2013/08/installing-oracle-grid-infrastructure.html on how to configure VM for installation of Oracle Database 12c. This installation is based on Oracle ASM so preparation of VM using my earlier post is mandatory. Once the VM is ready download the software and transfer to the VM.
Prerequisite
1. Prepare VM as mentioned in earlier post here.
2. Install and configure Oracle Grid Infrastructure 12c (12.1) as mentioned here.
Once the software is downloaded transfer the files using any ftp clients such as FileZilla e.t.c.

Unzip Files


Starting from Oracle Database 12c R1 Oracle has introduced a concept of CDB (Container Database). All the database until 11g are called as non-CDB (non Container Database). A container database is a database which stores metadata about other pluggable database. The architecture has been introduced to support multi-tenancy and cloud architecture. The database that we are going to create will be non-cdb. We will discuss about CDB in detail in later posts.


srvctl start asm
If you have configured multiple ASM disk groups then click on Browse button to select the ASM disk groups. Do not enable fast recovery area and database archiving now.


The image shows Oracle internally manages memory allocation between SGA and PGA. Click on "Sizing" tab.


When database is created using Job Role Segregation (JRS) i.e. GI installed as grid user and database installed as oracle user, then at times database could not be registered to Oracle Restart. In such cases, manually register database to Oracle Restart using following commands as oracle user:
[oracle@db12c-1 ~]$ srvctl add database -d noncdb -o /u01/app/oracle/product/12.1.0.1/db_1
[oracle@db12c-1 ~]$
[oracle@db12c-1 ~]$ srvctl modify database -d noncdb -p '+DATA_DISK01/NONCDB/spfilenoncdb.ora'
Check the status of database:
[oracle@db12c-1 ~]$ id -a
uid=64321(oracle) gid=54321(oinstall) groups=54321(oinstall),54322(dba),54328(asmdba),54333(oper) context=unconfined_u:unconfined_r:unconfined_t:s0-s0:c0.c1023
[oracle@db12c-1 ~]$
[oracle@db12c-1 ~]$ srvctl config database -d noncdb
Database unique name: noncdb
Database name: noncdb
Oracle home: /u01/app/oracle/product/12.1.0.1/db_1
Oracle user: oracle
Spfile: +DATA_DISK01/noncdb/spfilenoncdb.ora
Password file:
Domain:
Start options: open
Stop options: immediate
Database role: PRIMARY
Management policy: AUTOMATIC
Database instance: noncdb
Disk Groups: DATA_DISK01
Services:
[oracle@db12c-1 ~]$
[grid@db12c-1 ~]$ id -a
uid=64322(grid) gid=54321(oinstall) groups=54321(oinstall),54322(dba),54328(asmdba),54329(asmoper),54330(asmadmin) context=unconfined_u:unconfined_r:unconfined_t:s0-s0:c0.c1023
[grid@db12c-1 ~]$
[grid@db12c-1 ~]$ echo $ORACLE_SID
+ASM
[grid@db12c-1 ~]$ asmcmd
ASMCMD> ls
DATA_DISK01/
ASMCMD> cd DATA_DISK01
ASMCMD> ls
ASM/
NONCDB/
orapwasm --------------------asm password file
ASMCMD> ls -l
Type Redund Striped Time Sys Name
Y ASM/
Y NONCDB/
PASSWORD HIGH COARSE AUG 08 13:00:00 N orapwasm => +DATA_DISK01/ASM/PASSWORD/pwdasm.256.822922883
ASMCMD>
ASMCMD> ls
ASM/
NONCDB/
orapwasm
ASMCMD> cd NONCDB
ASMCMD> ls -l
Type Redund Striped Time Sys Name
Y CONTROLFILE/
Y DATAFILE/
Y ONLINELOG/
Y PARAMETERFILE/
Y TEMPFILE/
CONTROLFILE HIGH FINE AUG 13 09:00:00 N control01.ctl => +DATA_DISK01/NONCDB/CONTROLFILE/Current.265.823278789
CONTROLFILE HIGH FINE AUG 13 09:00:00 N control02.ctl => +DATA_DISK01/NONCDB/CONTROLFILE/Current.264.823278793
DATAFILE MIRROR COARSE AUG 13 09:00:00 N example01.dbf => +DATA_DISK01/NONCDB/DATAFILE/UNKNOWN.267.823279223
ONLINELOG MIRROR COARSE AUG 13 09:00:00 N redo01.log => +DATA_DISK01/NONCDB/ONLINELOG/group_1.263.823278837
ONLINELOG MIRROR COARSE AUG 13 09:00:00 N redo02.log => +DATA_DISK01/NONCDB/ONLINELOG/group_2.259.823278845
ONLINELOG MIRROR COARSE AUG 13 09:00:00 N redo03.log => +DATA_DISK01/NONCDB/ONLINELOG/group_3.260.823278853
PARAMETERFILE MIRROR COARSE AUG 13 10:00:00 N spfilenoncdb.ora => +DATA_DISK01/NONCDB/PARAMETERFILE/spfile.258.823281427
DATAFILE MIRROR COARSE AUG 13 09:00:00 N sysaux01.dbf => +DATA_DISK01/NONCDB/DATAFILE/SYSAUX.268.823278465
DATAFILE MIRROR COARSE AUG 13 09:00:00 N system01.dbf => +DATA_DISK01/NONCDB/DATAFILE/SYSTEM.262.823278591
TEMPFILE MIRROR COARSE AUG 13 09:00:00 N temp01.dbf => +DATA_DISK01/NONCDB/TEMPFILE/TEMP.257.823278887
DATAFILE MIRROR COARSE AUG 13 09:00:00 N undotbs01.dbf => +DATA_DISK01/NONCDB/DATAFILE/UNDOTBS1.266.823278763
DATAFILE MIRROR COARSE AUG 13 09:00:00 N users01.dbf => +DATA_DISK01/NONCDB/DATAFILE/USERS.261.823278759
ASMCMD>
ASMCMD> exit
[grid@db12c-1 ~]$
Prerequisite
1. Prepare VM as mentioned in earlier post here.
2. Install and configure Oracle Grid Infrastructure 12c (12.1) as mentioned here.
Download Software
Download the Oracle
software from the following links. It is mandatory to have oracle account to download the software.
- OTN: Oracle Database 12c
Release 1 (12.1.0.1) Software (64-bit).
- edelivery: Oracle Database
12c Release 1 (12.1.0.1) Software (64-bit)
Once the software is downloaded transfer the files using any ftp clients such as FileZilla e.t.c.

Unzip Files
Unzip the files using unzip utility.
unzip
linuxamd64_12c_database_1of2.zip
unzip
linuxamd64_12c_database_2of2.zip
You should now have a
single directory called "database" containing installation files.
1. Start the Installation
1.1 Login to the server as oracle user
First of all login to the server as oracle user. The user who is going to start the installation process. If you login as root user and switch to oracle user then there might be problem in starting the installer window.

1.2 Execute runInstaller
Go to the directory where runInstaller executable is located and execute the executable.

1.3 Configure Security Updates
Uncheck the check box as shown in image below and click on "Next" button to continue.

A warning will be displayed ignore the warning and click on "Yes" button to continue.

1.4 Download Software Updates
Leave the default selection as shown in the image below and click on "Next" button to continue.

1.5 Select Installation Option
Select "Install database software only" radio button as shown in the image below and click on "Next" button to continue.

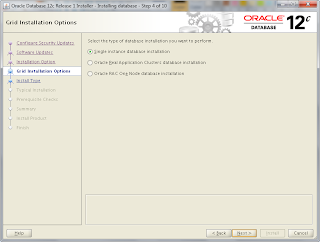
1.6 Grid Installation Option
Select "Single instance database installation" as shown in the image below and click on "Next" button to continue.

1.7 Select Product Languages
Click on the required language on the left hand side as you wish and click on the ">" button to shuttle the language on the right hand side. After required language selection click on "Next" button to continue. Best is to leave the default language selection to "English".

1.8 Select Database Edition
Select "Enterprise Edition (6.4 GB)" radio button as shown in the image below and click on "Next" button to continue.

1.9 Specify Installation Location
Provide the location where the database software will be installed and click on "Next" button to continue.

1.10 Privileged Operating System Groups
Make selection as shown in the image below and click on "Next" button to continue.

1.11 Perform Prerequisite Checks
The Oracle Universal Installer (OUI) performs automatic prerequisite checks and goes to summary page automatically in case no warning or errors are encountered.

1.12 Summary
Review the summary page, if you want to save the response file then click on "Save Response File". Click on "Install" button to continue with the installation.

1.13 Install Product
Product installation continues.

1.14 Execute Configuration Scripts
At the end of the installation OUI prompts to execute root configuration scripts. Open a new terminal switch to root user and execute the script in order.

Switch to root user:

Execute the script:
[root@db12c-1 ~]# id -a
uid=0(root) gid=0(root) groups=0(root) context=unconfined_u:unconfined_r:unconfined_t:s0-s0:c0.c1023
[root@db12c-1 ~]#
[root@db12c-1 ~]# /u01/app/oracle/product/12.1.0.1/db_1/root.sh
Performing root user operation for Oracle 12c
The following environment variables are set as:
ORACLE_OWNER= oracle
ORACLE_HOME= /u01/app/oracle/product/12.1.0.1/db_1
Enter the full pathname of the local bin directory: [/usr/local/bin]:
The contents of "dbhome" have not changed. No need to overwrite.
The contents of "oraenv" have not changed. No need to overwrite.
The contents of "coraenv" have not changed. No need to overwrite.
Entries will be added to the /etc/oratab file as needed by
Database Configuration Assistant when a database is created
Finished running generic part of root script.
Now product-specific root actions will be performed.
[root@db12c-1 ~]#
1.15 Finish
Click on "Close" button to complete the installation. This marks the end of Oracle Database 12c binaries installation.

2. Creating Database using dbca
In step 1 we successfully installed Oracle Database 12c binaries. Now, we are ready to create 12c database using dbca (Database Configuration Assistant) utility.2.1 Login as oracle user
Login to the server as oracle user. The user who is going to start the dbca (Database Configuration Assistant) wizard. If you login as root user and switch to oracle user then there might be problem in starting the installer window.

2.2 run dbca
Start the dbca (Database Configuration Assistant) wizard.

2.3 Database Operation
Select on "Create Database" radio option and click on "Next" button to continue.
2.4 Creation Mode
Select the "Advanced Mode" radio option and click on "Next" button to continue.
2.5 Database Template
Select "General Purpose or Transaction Processing" radio option and click on "Next" button to continue.
2.6 Database Identification
Enter a name for database. If you server is part of a domain then in Global Database Name you have to provide the database concatenated with domain name. For e.g. noncdb.mydomain.com.Starting from Oracle Database 12c R1 Oracle has introduced a concept of CDB (Container Database). All the database until 11g are called as non-CDB (non Container Database). A container database is a database which stores metadata about other pluggable database. The architecture has been introduced to support multi-tenancy and cloud architecture. The database that we are going to create will be non-cdb. We will discuss about CDB in detail in later posts.

2.7 Management Option
Leave both the check check boxes unchecked and click on "Next" button to continue.
2.8 Database Credentials
Select "Use the Same Administrative Password for All Accounts" radio option, provide the password and click on "Next" button to continue. Make a note of this password and keep it secured.
2.9 Network Configuration
We have already installed Oracle Grid Infrastructure (GI) 12c, a listener is created as part of GI 12c installation. The image below shows the listener of GI running on port 1251. Select the listener and click on "Next" button to continue. Remember the status of the listener that you select must be "Up" before you proceed further from here.
2.10 Storage Locations
We have already created a ASM disk group DATA_DISK01 as part of GI 12c installation in our previous post. The asm services must be running in order to access the asm disk group. In order to start the asm services execute the following command as grid user.srvctl start asm
If you have configured multiple ASM disk groups then click on Browse button to select the ASM disk groups. Do not enable fast recovery area and database archiving now.

2.11 File Location Variables
In order to view database variables and ORACLE_HOME click on "File Location Variables" button.
2.12 Database Options - Sample Schemas
Click on "Sample Schemas" to create sample schemas. This should be used with care in case of production environments because unnecessary objects and users discouraged in production environments. Click on "Next" button to continue.
2.13 Database Options - Database Vault & Label Security
We are not configuring Database Vault and Label Security now. So leave the default selection and click on "Next" button to continue.
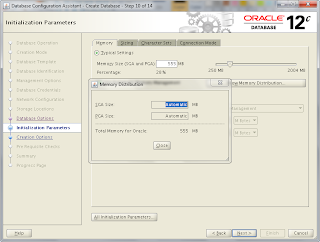
2.14 Initialization Parameters - Memory
By default Oracle reserves 40% of the available memory. Since we do not have sufficient memory here i have decreased the memory to be 28%. Always select "Use Automatic Memory Management" until and unless it is not required. Click on "Show Memory Distribution" to see how Oracle distributes the memory.
The image shows Oracle internally manages memory allocation between SGA and PGA. Click on "Sizing" tab.

2.15 Initialization Parameters - Sizing
The default database block size is 8K (8192 bytes). If you want to you can change the number of processes and click on "Character Sets" tab.
2.16 Initialization Parameters - Character Sets
Select "Use Unicode (AL32UTF8)" radio option and click on "Connection Mode" tab.
2.17 Initialization Parameters - Connection Mode
Select "Dedicated Server Mode" radio option and click on "Next" button to continue.
2.18 Creation Options
If you want to generate database creation scripts then check "Generate Database Creation Scripts" check box. In order to change the database storage locations click on "Customize Storage Locations".
2.19 Storage Locations
From this page database storage parameters can be changed.
2.20 Storage Locations - Control Files
Click on "Control Files" in order to change the number and location of control files.
2.21 Storage Locations - Datafiles
Click on "Datafiles" in order to change the location of datafiles.
2.22 Storage Locations - Redo Log Groups
Image showing summary of Redo Log Groups.
Storage Locations - Redo Log Group 1
Click on "1" in order to change the number redo log members and location of redo log files of redo log group 1.
Storage Locations - Redo Log Group 2
Click on "2" in order to change the number redo log members and location of redo log files of redo log group 2.
Storage Locations - Redo Log Group 3
Click on "3" in order to change the number redo log members and location of redo log files of redo log group 3.
2.23 Prerequisite Checks
Oracle automatically performs validation checks. If anything goes wrong Oracle will stop the process right here.
2.24 Create Database Summary
Review the summary page properly and click on "Finish" button to start the database creation process.
2.25 Progress page - Script Generation
Since we check the option to generate database creation script, the dbca shows the confirmation message that the scripts has been created. Click on "Ok" button to start the dbca process.
2.26 Progress Page - Database Creation
Image showing database creation in process.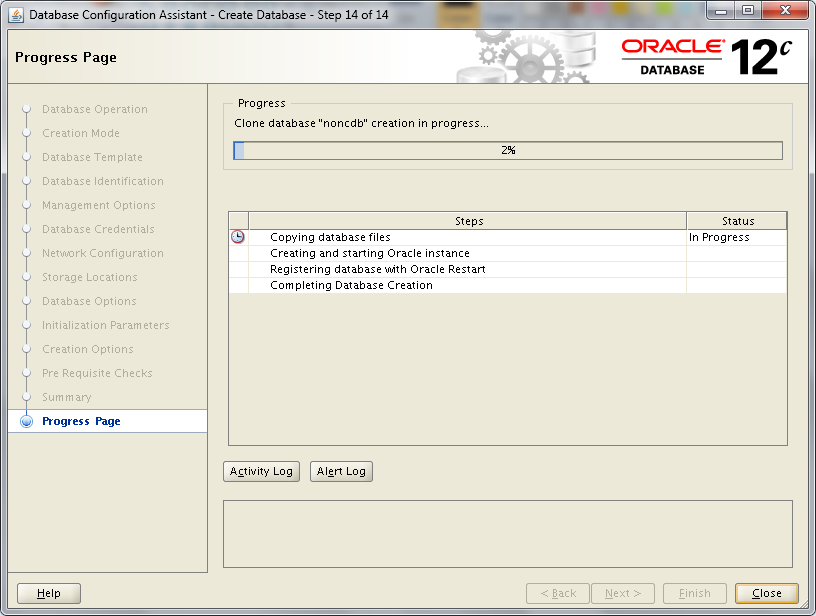
2.27 dbca Complete
Image showing the database creation complete. Click on "Password Management" button to see the default users created by dbca.
2.28 Password Management
The image lists the default users created by dbca.

2.29 Progress Page - Complete
Image showing the dbca process completed. Click on "Close" button to complete the dbca process and close the window.
When database is created using Job Role Segregation (JRS) i.e. GI installed as grid user and database installed as oracle user, then at times database could not be registered to Oracle Restart. In such cases, manually register database to Oracle Restart using following commands as oracle user:
[oracle@db12c-1 ~]$ srvctl add database -d noncdb -o /u01/app/oracle/product/12.1.0.1/db_1
[oracle@db12c-1 ~]$
[oracle@db12c-1 ~]$ srvctl modify database -d noncdb -p '+DATA_DISK01/NONCDB/spfilenoncdb.ora'
Check the status of database:
[oracle@db12c-1 ~]$ id -a
uid=64321(oracle) gid=54321(oinstall) groups=54321(oinstall),54322(dba),54328(asmdba),54333(oper) context=unconfined_u:unconfined_r:unconfined_t:s0-s0:c0.c1023
[oracle@db12c-1 ~]$
[oracle@db12c-1 ~]$ srvctl config database -d noncdb
Database unique name: noncdb
Database name: noncdb
Oracle home: /u01/app/oracle/product/12.1.0.1/db_1
Oracle user: oracle
Spfile: +DATA_DISK01/noncdb/spfilenoncdb.ora
Password file:
Domain:
Start options: open
Stop options: immediate
Database role: PRIMARY
Management policy: AUTOMATIC
Database instance: noncdb
Disk Groups: DATA_DISK01
Services:
[oracle@db12c-1 ~]$
2.30 Navigate the ASM Disk Groups
Login to a terminal as grid user and navigate the ASM disk group after database is created. Starting from Oracle Database 12c R1 password file can now be placed in ASM disks and in case of RAC the password file can be placed in shared ASM disks.[grid@db12c-1 ~]$ id -a
uid=64322(grid) gid=54321(oinstall) groups=54321(oinstall),54322(dba),54328(asmdba),54329(asmoper),54330(asmadmin) context=unconfined_u:unconfined_r:unconfined_t:s0-s0:c0.c1023
[grid@db12c-1 ~]$
[grid@db12c-1 ~]$ echo $ORACLE_SID
+ASM
[grid@db12c-1 ~]$ asmcmd
ASMCMD> ls
DATA_DISK01/
ASMCMD> cd DATA_DISK01
ASMCMD> ls
ASM/
NONCDB/
orapwasm --------------------asm password file
ASMCMD> ls -l
Type Redund Striped Time Sys Name
Y ASM/
Y NONCDB/
PASSWORD HIGH COARSE AUG 08 13:00:00 N orapwasm => +DATA_DISK01/ASM/PASSWORD/pwdasm.256.822922883
ASMCMD>
ASMCMD> ls
ASM/
NONCDB/
orapwasm
ASMCMD> cd NONCDB
ASMCMD> ls -l
Type Redund Striped Time Sys Name
Y CONTROLFILE/
Y DATAFILE/
Y ONLINELOG/
Y PARAMETERFILE/
Y TEMPFILE/
CONTROLFILE HIGH FINE AUG 13 09:00:00 N control01.ctl => +DATA_DISK01/NONCDB/CONTROLFILE/Current.265.823278789
CONTROLFILE HIGH FINE AUG 13 09:00:00 N control02.ctl => +DATA_DISK01/NONCDB/CONTROLFILE/Current.264.823278793
DATAFILE MIRROR COARSE AUG 13 09:00:00 N example01.dbf => +DATA_DISK01/NONCDB/DATAFILE/UNKNOWN.267.823279223
ONLINELOG MIRROR COARSE AUG 13 09:00:00 N redo01.log => +DATA_DISK01/NONCDB/ONLINELOG/group_1.263.823278837
ONLINELOG MIRROR COARSE AUG 13 09:00:00 N redo02.log => +DATA_DISK01/NONCDB/ONLINELOG/group_2.259.823278845
ONLINELOG MIRROR COARSE AUG 13 09:00:00 N redo03.log => +DATA_DISK01/NONCDB/ONLINELOG/group_3.260.823278853
PARAMETERFILE MIRROR COARSE AUG 13 10:00:00 N spfilenoncdb.ora => +DATA_DISK01/NONCDB/PARAMETERFILE/spfile.258.823281427
DATAFILE MIRROR COARSE AUG 13 09:00:00 N sysaux01.dbf => +DATA_DISK01/NONCDB/DATAFILE/SYSAUX.268.823278465
DATAFILE MIRROR COARSE AUG 13 09:00:00 N system01.dbf => +DATA_DISK01/NONCDB/DATAFILE/SYSTEM.262.823278591
TEMPFILE MIRROR COARSE AUG 13 09:00:00 N temp01.dbf => +DATA_DISK01/NONCDB/TEMPFILE/TEMP.257.823278887
DATAFILE MIRROR COARSE AUG 13 09:00:00 N undotbs01.dbf => +DATA_DISK01/NONCDB/DATAFILE/UNDOTBS1.266.823278763
DATAFILE MIRROR COARSE AUG 13 09:00:00 N users01.dbf => +DATA_DISK01/NONCDB/DATAFILE/USERS.261.823278759
ASMCMD>
ASMCMD> exit
[grid@db12c-1 ~]$
Check the asm parameters as grid user:
[grid@db12c-1 ~]$ srvctl config asm
ASM home: /u01/app/grid/product/12.1.0.1/grid
Password file: +DATA_DISK01/orapwasm
ASM listener: LISTENER
Spfile: +DATA_DISK01/ASM/ASMPARAMETERFILE/registry.253.822922873
ASM diskgroup discovery string: /dev/ASM*
[grid@db12c-1 ~]$
[grid@db12c-1 ~]$ srvctl config asm
ASM home: /u01/app/grid/product/12.1.0.1/grid
Password file: +DATA_DISK01/orapwasm
ASM listener: LISTENER
Spfile: +DATA_DISK01/ASM/ASMPARAMETERFILE/registry.253.822922873
ASM diskgroup discovery string: /dev/ASM*
[grid@db12c-1 ~]$
Hope this helps

No comments:
Post a Comment